Advocacy by Design / Lesson 8 of 17 · Light It Up
Your First Circuit
Here’s the whole lesson in one sentence: take an LED and a coin cell battery, and make it light up.
That’s it. No instructions yet. Get a CR2032 battery and an LED, and figure it out.
Seriously, go try it first
(We’ll wait.)
…
Got light? Congratulations — you just built a circuit: a path for electrical current to flow from one side of a battery, through something useful, and back to the other side. Everything else in this module — paper circuits, wearable circuits, programmable LED strips — is this exact idea with better packaging.
Didn’t light? Flip the LED around and try again. That flip is the actual lesson:
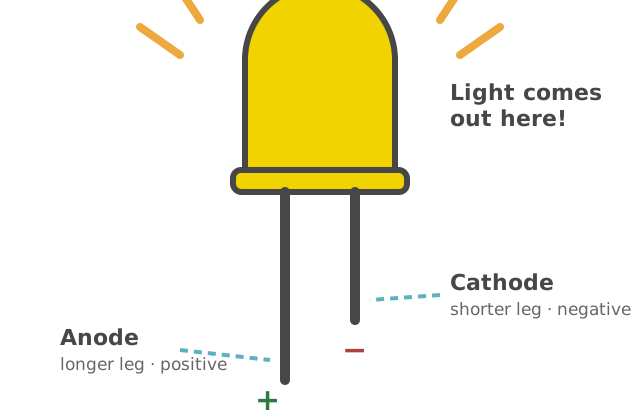
What you discovered
- The LED’s longer leg is positive (the anode); the shorter leg is negative (the cathode). Current only flows one way through it — that’s the “D” in LED, diode.
- The battery has a + face and a − face. Positive leg to positive face, negative to negative. Backwards = nothing (harmlessly nothing — you can’t hurt an LED with a coin cell by flipping it).
Keep playing
- How many LEDs can you light on one battery? What happens to the brightness?
- Compare colors: blue and green LEDs are hungrier than red — mix them on one battery and sometimes the red hogs the power. Which combinations work?
- Pull out your Elements Explorer color words from the Design It module. Can you match “angry,” “calm,” “alive” with actual LEDs? You’re now designing with light.
For teachers: The sequencing here is the pedagogy: exploration before explanation, every time. Let designers light the LED, then ask what they noticed and why they think it works one way only — let them explain in their own words before you introduce “anode” or electron flow. The vocabulary lands ten times harder when it names something they already did.
Before you move on
- Every designer on the team has personally lit an LED (not watched one get lit)
- You can explain long-leg/short-leg to someone who missed class